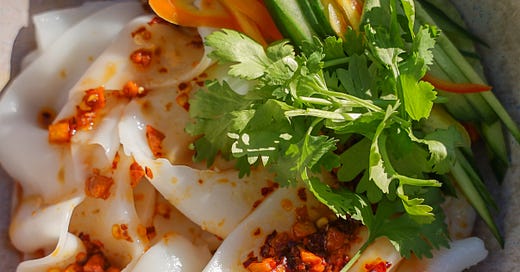
Have You Eaten Yet? Here’s a new recipe from my kitchen to yours that I hope you’ll love! For more recipes, you can pre-order my next cookbook, Chinese Enough, or purchase Mooncakes and Milk Bread for all things Chinese Baking!
While I was in 99 Ranch a few weeks ago someone tapped me on the shoulder and asked me “do you know where these noodles are?” and proceeded to show me a video of what looked like a mukbang where a woman was eating a big bowl of wide noodles covered in chili oil. I was little taken back at first because being presented with a stranger’s social media feed out in the wild is a little weird… and then I was wondering if I just looked like a person who knows my way around a 99 Ranch noodle aisle.
I decided to help the man and watched the video for a few moments to be able to discern that they were starch based noodles based on their slight translucency and relative bounciness. I had a hunch that these were liang pi noodles, which are cold noodles often tossed with seitan and vegetables in a vinegary sauce of soy and chili oil. They are a popular noodle in Northern China, specifically Xi’an, and are made out of wheat starch, but you rarely see these noodles dried or prepackaged at the store. I pointed him in the direction of the starch based noodles to see if there was something there that would work and explained how dried sweet potato starch or mung bean starch noodles might have a similar texture but unfortunately none of the ones in front of us are very wide. For wide noodles he would have to pick up a package of fresh rice noodle sheets and cut himself but even those have a different texture.
After my short noodle lesson we went our separate ways and I thought about how it had been ages since I’ve had liang pi noodles, the last time was probably during a trip to NYC at Xi’an famous foods and before that it was over 10 years ago when I lived in Beijing for a summer. And just like that stranger in the noodle aisle I suddenly had a craving for extra wide chewy noodles doused in soy, vinegar, and chili oil… but I was determined to make them on my own.
Liang Pi translates to “cold skin” so these are often referred to as cold skin noodles. While the dish is meant to be served cold, making it a great meal for the summer, the name comes from the fact that the texture resembles the texture of chilled chicken skin like in Haianese chicken or my chilled poached chicken. The noodles are made from wheat starch which is a byproduct of making seitan, so you’ll often see the noodle dish served with pieces of seitan. The process of making seitan is so interesting but also time consuming. You essentially make a firm dough, like a dumpling dough, and wash the dough in water over and over again which causes the wheat starch to rinse away or separate from the wheat gluten/seitan. The starchy water is left to sit for a few hours so that the starches settle to the bottom and that is what you use to make liang pi! Chinese noodle makers are so resourceful and there’s a whole wide world of starch based noodles out there to explore.
I’m normally all for a kitchen project, but I wasn’t really in the mood for making seitan and waiting that long for my noodles. So I decided to use a short cut and dig out my bag of wheat starch. I always have wheat starch in my pantry because I use it to make crystal dumpling wrappers for dumplings like har gow. Wheat starch is on the firmer side compared to cornstarch or sweet potato starch, which helps give crystal dumpling dough some structural integrity and in the case of these noodles, their distinctive chew. Chinese grocery stores will almost always stock wheat starch but you can check out other Asian grocery stores too. You can also order it online - during 2020 I accidentally ordered 10 bags of it so I was quite literally stocked on wheat starch for a long time.
It took a few trials and errors to get the right ratio of water to wheat starch right but eventually we got there. The batter is steamed to create these thin sheets of noodle. I use the same set up and process for when I make homemade cheung fun (rice noodle rolls). My steaming vessel of choice is a large and deep pan, like the braiser shown. I have a shallow metal trivet that sits inside within the water so that 1/8th sheet pans for steaming can sit on top. If you don’t have this exact set up, don’t fret! I can almost guarantee you can recreate something similar using cookware you already have in your kitchen. And just because I was curious, I tested cooking the batter in the microwave and I was shocked that it worked pretty well! Microwave instructions are included with the recipe below!
I was tremendously happy with how these noodles came out! So bouncy and chewy! It reminded me of when I was a little kid and how I would only eat the wrapper of my har gow (shrimp crystal dumplings) dipped in soy sauce, leaving the shrimp filling for my goong goong to eat instead. Knowing now that the wrappers are made of wheat starch, I guess you could say I’ve always been a textured noodle girl.
I recommend saving this recipe for when you’re either specifically craving liang pi or looking for a noodle project (an extremely big noodle project may or may not be in my future). There’s something incredibly satisfying about making your own homemade noodles!
Some exciting things to share soon!
I have a weekend edition of the newsletter coming out this weekend for all paid subscribers full of summer desserts, including a Sweet Corn Soufflé Cheesecake that I’ve been working on all summer and it’s finally perfect.
I’m going on BOOK TOUR this Fall and I’ll be able to share details and what cities I’ll be going to very soon!
My parents are visiting me next week and I’m already preparing a newsletter dedicated to all the places I decide to take my picky Chinese parents to eat 😅
Hope you all have a great week!!! Thank you as always for reading and supporting this little corner of the internet 🧡
Liang Pi (Cold Skin Noodles)
Serves 2
For the noodles:
240 (2 cups) wheat starch
600g (2 1/2 cups) water
neutral oil, for brushing the pans
For the sauce:
2 tbsp chili oil
2 tbsp rice or Chinese black vinegar
3 tbsp soy sauce
1 tbsp sesame oil
2 tsp granulated sugar
Toppings:
torn Cilantro
julienned cucumber
julienned bell pepper
In a large mixing bowl, whisk to combine wheat starch and water.
Prepare your steamer set up. I like to use a braiser but any wide and deep pan with a lid will work just fine. Fill your vessel with 1” of water (adjust water according to the height of your trivet, it should just be below it) and place a trivet or make a collar of bundled up foil for your steaming tray to sit on top of. Heat over medium high heat until simmering. Prepare a cooling bath (this is optional but speeds up the process) by filling up a deep baking pan with ice and water.
Brush a small baking pan (any shallow heat safe pan that will fit in your steaming vessel will work and it is nice to have 2 or more pans so you can continue to steam more layers while the previous layer is cooling) with some neutral oil. Give the batter a stir because the starch will settle and ladle in enough batter for it to just cover the whole bottom of the pan. Immediately place on the steamer, cover with a lid and steam for 3 to 4 minutes. When you remove the lid, it’s a good sign if you see a big air bubble underneath the sheet of noodle so you know the noodle is done. Transfer the pan to the cooling bath while you prepare your next pan of batter to steam. Remember to mix the batter before ladeling into the pan for every batch. Add more water to the vessel as needed.
Once the sheet of noodle has cooled to touch, a few minutes, loosen up the edges of the noodles with a bench scraper or offset spatula. Carefully pull up the noodle until it fully releases from the pan. A properly cooked noodle should be pliable. Place on a cutting board and cut the noodle sheet into white strips. Transfer the noodles into individual bowls.
Troubleshooting the batter: if the cooked noodles are dry and cracking when you try to release then the batter needs a little more water. If the cooked noodle is too mushy and falls apart then the batter needs more wheat starch or needs to steam longer. Treat the first noodle sheet almost like your first pancake, you’ll eventually get the time and texture right.
In a small bowl, mix to combine the sauce ingredients. Top each bowl with some cucumber, pepper, cilantro, and a few spoonfuls of sauce. Toss the noodles until fully coated and enjoy!
Notes for microwaving: I’m surprised how well this works in the microwave! Although I still prefer the texture of a properly steamed noodle, this is a fun option if you prefer it.
Prepare your batter as instructed. Brush a large glass/ceramic/microwave safe dish or container with neutral oil. Give the batter a stir because the starch will settle and ladle in enough batter for it to just cover the whole bottom of the pan. Loosely cover with a lid or another plate to trap the steam and immediately microwave for 2 minutes (prepare to adjust the time based on your microwave), until the batter is set and translucent. Allow the noodle to cool before loosening and removing from the dish.
I made this tonight with the steam function on our Anova Precision Oven. It was fun to experiment and my family enjoyed the results!
What worked for me: 212F, 100% steam, metal (not glass) tray sized for the oven (almost 1/2 sheet), 10-12 minutes.
Thanks for the recipe and detailed approach. It really is like making pancakes for the first time 😉
The process is fascinating and calming all at once. 💛